Note: this tutorial was made for older versions of DMD, DFL and Entice Designer. While it can still help you along, you will probably get errors if you attempt to compile.
We will build a simple AddressBook application, which uses SQLite as the data storage engine.
This tutorial's purpose is to help D users get in touch with DFL, Entice and SQLite4D.
Download Entice Designer Address Book tutorial. The download comes with SQLite4D.
Our plan is quite simple, all we need is an application to store and retrieve data, and a user interface to operate it.
We will split the work into 3 parts:
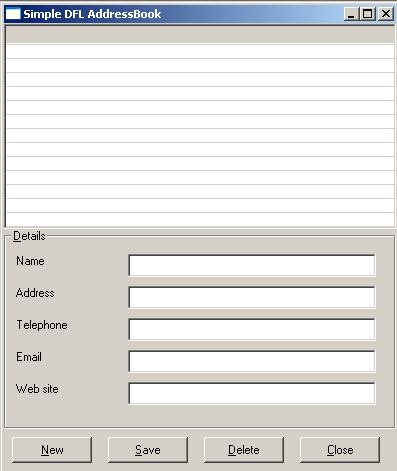
We can accomplish the whole addressbook functionality within one single form. A ListView control will be used to hold and display each record as a human understandable identifier (contacts name); some TextBox elements grouped in a GroupBox to insert, edit and display the data; and we also need Buttons to control our application.
To begin...
Start Entice and create a new form (clicking on "New" or "New Form" button) -
Choose a path (i.e. D:\works\myaddressbook) and a name for the form.
Select "Main Form" - this will create the main() function which starts the form (otherwise, the form must be called from another control).
Now you can see the form layout in the designer area.
Drag its margins until you match the desired dimensions (400,460). Alternatively, you can change its width and height by editing their values in the Property Panel (docked on the right).
Double click on the text property in the Property Panel and enter "Simple DFL AddressBook", this will set the form caption.
Add a Panel to the form, dock it to BOTTOM, and change its name to "buttons". Set its height to 40.
Now add a GroupBox and change its dock property to FILL so it fills the parent's unused space.
Note: we added the bottom Panel before the GroupBox because the order is important in DFL. If you add the Panel after GroupBox, it won't be displayed because the GroupBox is already filling all the space.
Change its name to "group" and set the text property to "De&tails". ("&" is for mnemonics)
Labels: click on the Label icon in the ToolBox, hold the control key on your keyboard while clicking multiple times inside the GroupBox in the designer, add 5 Labels this way (to exit this mode, click on the pointer in the ToolBox) arrange them by dragging or by editing their top and left properties in the Property Panel. Set their text as follows: "name", "address", "telephone", "email" and "website"
Add 5 TextBoxes in the same manner and change their names according to this pattern txtName, txtAddress...
Don't forget to add 4 buttons in the bottom Panel area. Set their height to 26, their names to btn1, btn2, btn3 and btn4 and text to "&New", "&Save", "&Delete", "&Close"
Quick test: save your work, compile it with dfl -ofsab <filename> -gui
Switch to text editing mode (<filename> tab at top of designer); add the following imports just above the class declaration
private import 	sqlite_import, sqlite_oo;
import std.string;
add the following declarations after the Entice variables declaration block
SqliteDatabase db;
SqliteResult res;
int rec;
add this code after the initializeMainForm() call in the constructor
initDatabase();And the initDatabase function is defined as:
private void initDatabase()
{
	db = new SqliteDatabase("data.db");
}
This will open the database "data.db" or create a blank one if the file is not found;CREATE table `contacts` ( id integer primary key, name, address, telephone, email, website);you can run this query using any tool you like (the download package contains a small sql commander "sqlc.exe"), or let the application take care of this.
res = db.query("SELECT * FROM sqlite_master WHERE type='table' AND name='contacts'");
	//read the sqlite documentation for SQL queries;

if (!res.numRows) //if no row is returned we need to setup our table;
{
	db.exec(/* the query above */);
}
Add a function to save contact's details and one to delete contacts
private void saveContact(char[][] data) //data contains the TextBox.Texts
{
//data[0] holds the record number, if =0, it means add a new record, otherwise update this record
	if(data[0] == "0")
	{
		db.exec("INSERT INTO contacts (name, address, telephone, email, website)
						values(
						'"~data[1]~"',
						'"~ data[2] ~"',
						'"~ data[3] ~"',
						'"~ data[4] ~"',
						'"~ data[5] ~"'
				)");
	} else {
		db.exec("UPDATE contacts SET
						name = '"~data[1]~"',
						address = '"~data[2]~"',
						telephone = '"~data[3]~"',
						email = '"~data[4]~"',
						website = '"~data[5]~"'
				WHERE 	id='"~data[0]~"'
				");
	}
}
private void deleteContact(char[] id)
{
	db.exec("DELETE FROM contacts WHERE id='"~id~"' ");
}
Add code to load contact. We will pass the ListView to the function which loads data directly into the ListView
private void getContacts(ListView lv)
{
	lv.clear(); // clear any elements and load data after that.
	// This is important because we will call this function after every contact editing or deleting operation.
	res = db.query("SELECT * FROM contacts");
	char[][] c;
	while((c = res.fetch()) != null)
	{
		lv.addRow(c);
	}
}
Entice is still under development so there are few things we need to take care of,
like adding columns to ListView. If you compile the code right now, you'll see that it runs OK, but the list box does not show any records, but it will after adding columns:
initDesign(); //add this line to the constructor

private void initDesign()
{
	ColumnHeader col;
	/* this is used to store the sqlite row id */
		col = new ColumnHeader;
		col.width =0; // there is no reason to make it visible
					  // the data is there regardless of it's size;
	lview.columns.add(col);
		col = new ColumnHeader;
		col.text = "Name";
		col.width=400;
	lview.columns.add(col);
		col = new ColumnHeader;
	lview.columns.add(col);
		col = new ColumnHeader;
	lview.columns.add(col);
		col = new ColumnHeader;
	lview.columns.add(col);
		col = new ColumnHeader;
	lview.columns.add(col);
}
We need to add actions to Form elements according to the functionality plan below:
lview.doubleClick ~= &lview_doubleClick; //on double_click event handling
btn1.click ~= &btn1_click;
btn2.click ~= &btn2_click;
btn3.click ~= &btn3_click;
btn4.click ~= &btn4_click;
and the actions:
protected void lview_doubleClick(Object sender, EventArgs ea)
{
	if(!lview.focusedItem) return false; // if no item is focused(you clicked below records) stop executing;

	txtName.text		= lview.focusedItem.subItems.opIndex(0).text;
	txtAddress.text		= lview.focusedItem.subItems.opIndex(1).text;
	txtTelephone.text	= lview.focusedItem.subItems.opIndex(2).text;
	txtEmail.text		= lview.focusedItem.subItems.opIndex(3).text;
	txtWebsite.text		= lview.focusedItem.subItems.opIndex(4).text;
	btn2.text		= "&Edit";
	btn2.enabled		= true;
	btn3.enabled		= true;
	rec = atoi(lview.focusedItem.text); // set the record number;
}

protected void btn1_click(Object sender, EventArgs ea)
{
	group.enabled = true;
	txtName.text		= "";
	txtAddress.text		= "";
	txtTelephone.text	= "";
	txtEmail.text		= "";
	txtWebsite.text		= "";
	btn2.text		= "&Save";
	btn2.enabled		= true;
	btn3.enabled		= false;
	btn4.text		= "&Cancel";
	rec = 0;
}

protected void btn2_click(Object sender, EventArgs ea)
{
	if (btn2.text == "&Save")
	{
		char[][] c;
		c ~= std.string.toString(rec);
		c ~= txtName.text;
		c ~= txtAddress.text;
		c ~= txtTelephone.text;
		c ~= txtEmail.text;
		c ~= txtWebsite.text;
		saveContact(c);
		getContacts(lview);
		group.enabled 		= false;
		txtName.text		= "";
		txtAddress.text		= "";
		txtTelephone.text	= "";
		txtEmail.text		= "";
		txtWebsite.text		= "";
		btn2.enabled 		= false;
		btn3.enabled 		= false;
		btn4.text 		= "&Close";
		rec=0;
	} else {
		group.enabled 		= true;
		btn2.text 		= "&Save";
		btn3.enabled 		= false;
		btn4.text 		= "&Cancel";
	}
}

protected void btn3_click(Object sender, EventArgs ea)
{
	deleteContact(std.string.toString(rec));
	getContacts(lview);
	group.enabled 		= false;
	txtName.text		= "";
	txtAddress.text		= "";
	txtTelephone.text	= "";
	txtEmail.text		= "";
	txtWebsite.text		= "";
	btn2.enabled 		= false;
	btn3.enabled 		= false;
	btn4.text		= "&Close";
}

protected void btn4_click(Object sender, EventArgs ea)
{
	if(btn4.text == "&Close")
	{
		close();
	} else {
		group.enabled 	= false;
		btn4.text 	= "&Close";
		if(rec==0)
		{
			txtName.text		= "";
			txtAddress.text		= "";
			txtTelephone.text	= "";
			txtEmail.text		= "";
			txtWebsite.text		= "";
			btn2.enabled 		= false;

		} else {
			btn2.enabled		= true;
			btn2.text 		= "&Edit";
			btn3.enabled 		= true;
		}

	}
and that would be it!
Compile with dfl -ofsab -gui -release <filename> sqlite_import sqlite_oo sqlite.lib
To add an application icon:
create a filename named sab.rc containing this line:
101 ICON DISCARDABLE "sab.ico"
run from command line: rcc sab.rc this will create a file sab.res
add this line to the Form constructor:
icon = new Icon(LoadIconA(GetModuleHandleA(null), cast(char*) 101));
compile with dfl -ofsab -gui -release <filename> sqlite_import sqlite_oo sqlite.lib sab.res
(See this for more information on using icons)
Thank you for your patience.
Please send feed-back about this tutorial to un_guru at yahoo dot com
Edited by Christopher E. Miller
DFL
and Entice Designer
written by Christopher E. Miller
dprogramming.com